 微信扫一扫
微信扫一扫README
MCP Inspector
The MCP inspector is a developer tool for testing and debugging MCP servers.
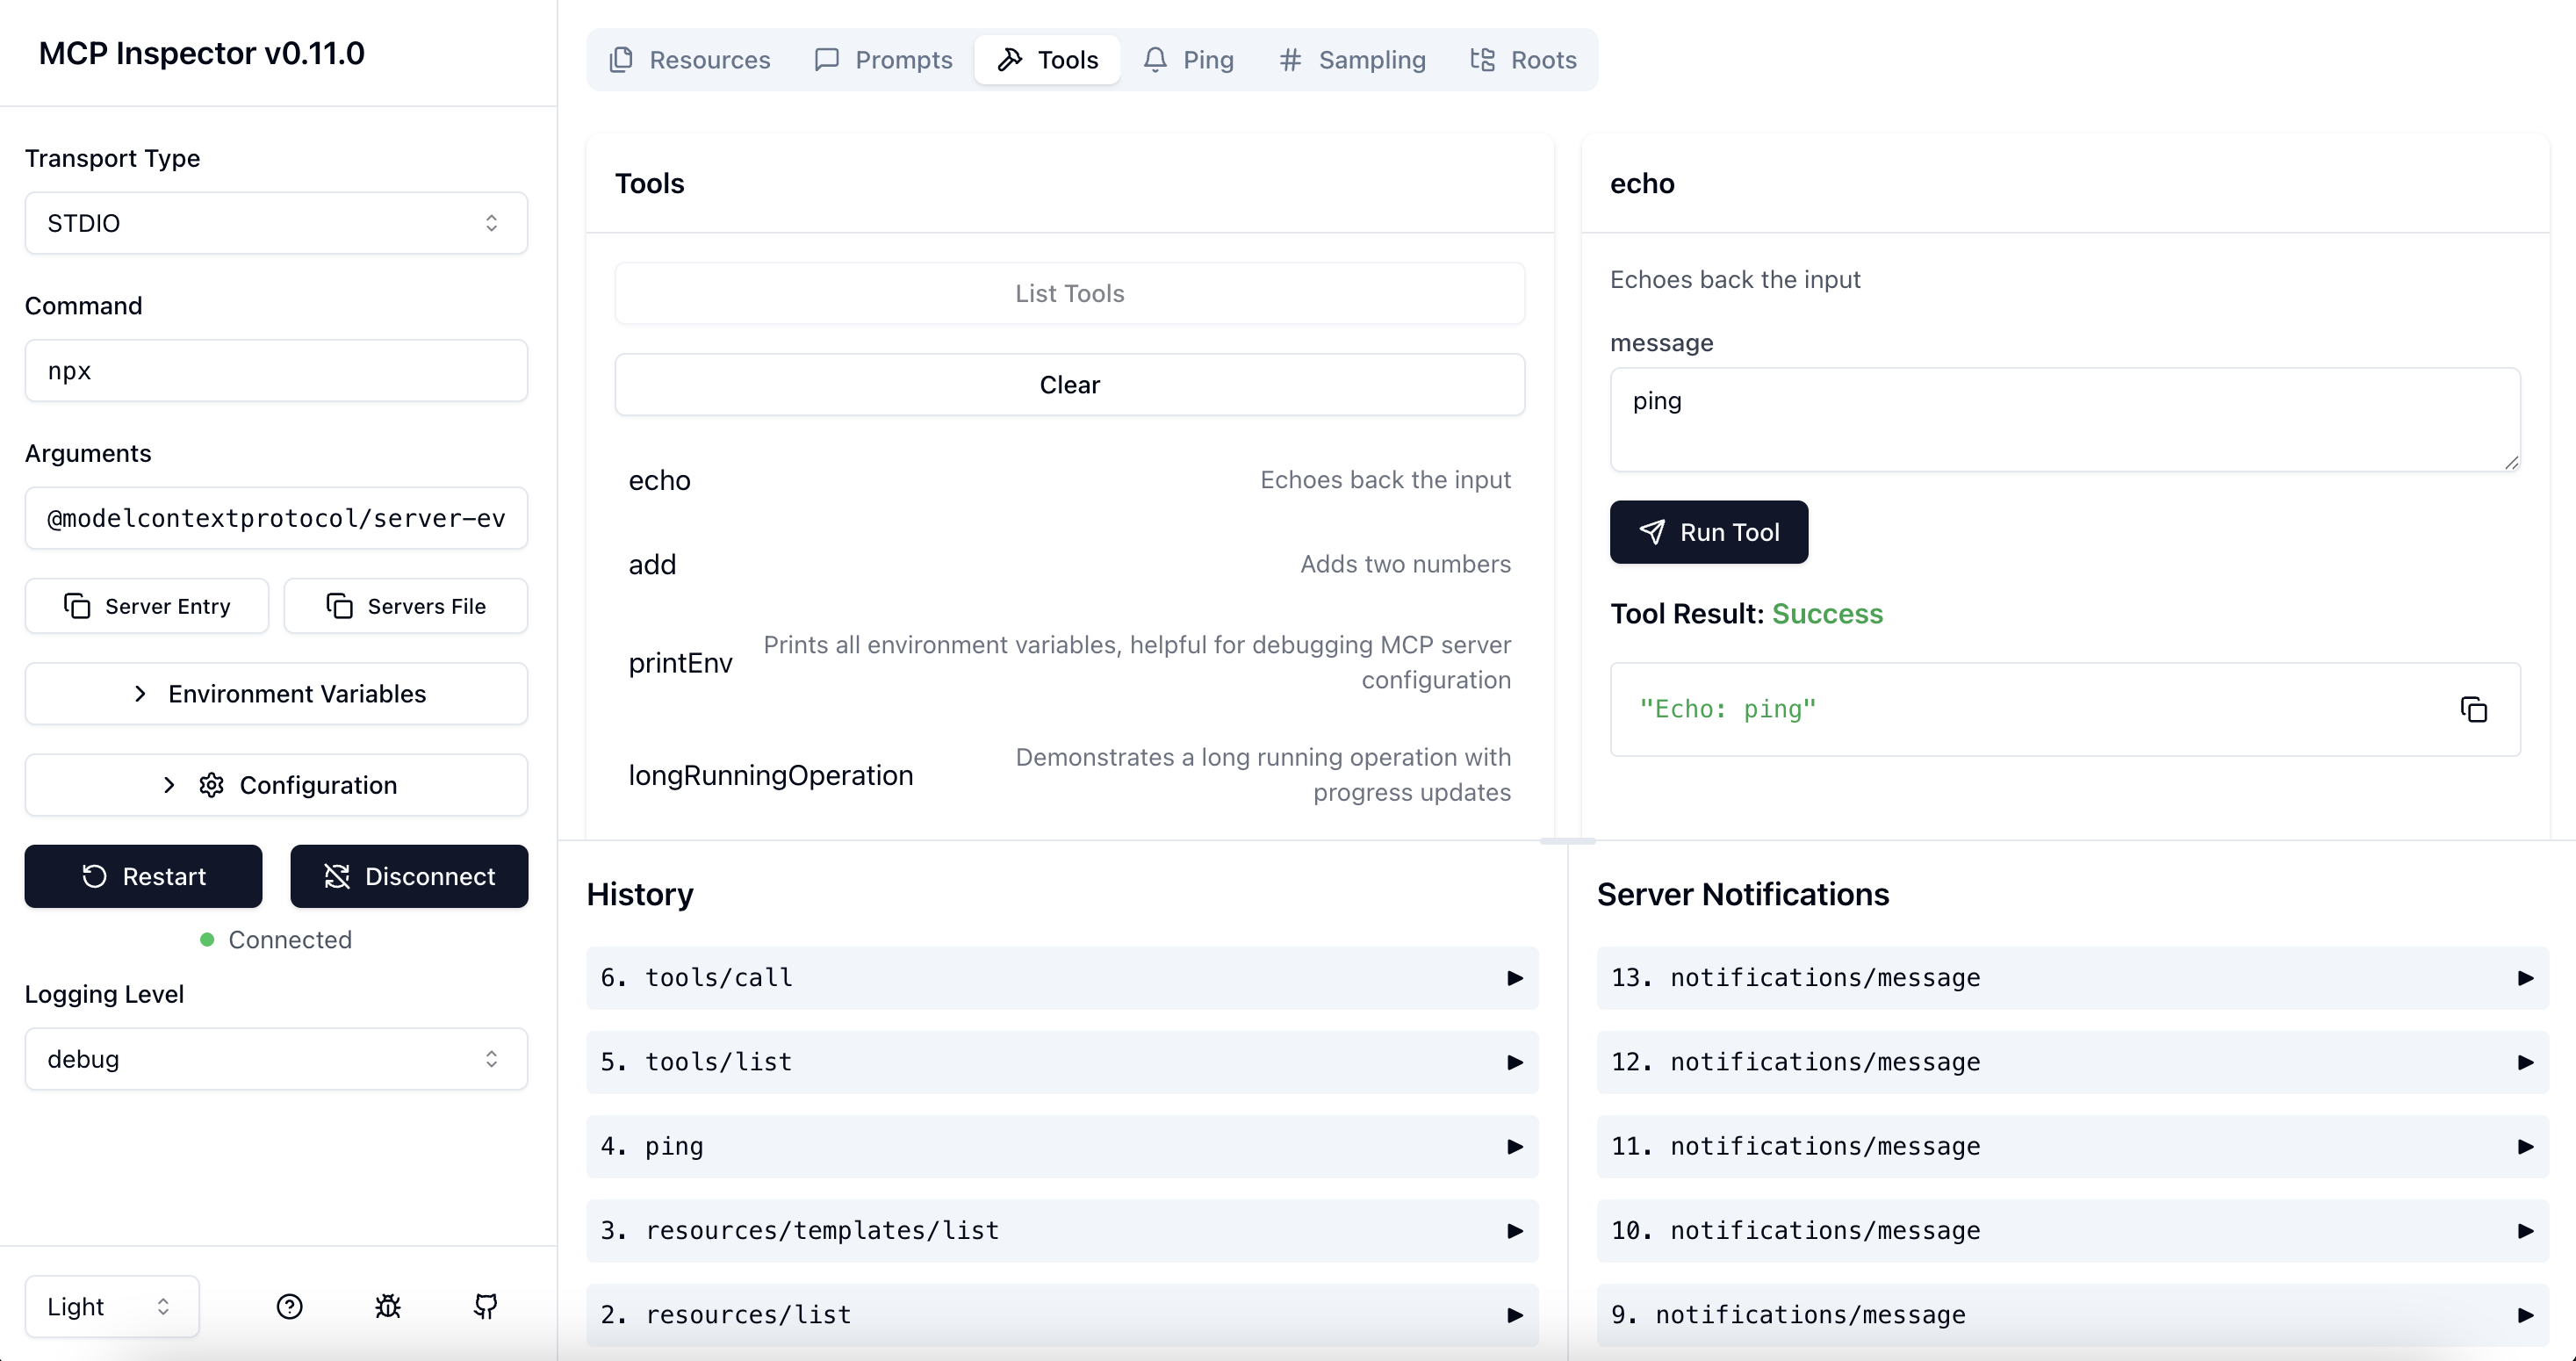
Running the Inspector
Requirements
- Node.js: ^22.7.5
From an MCP server repository
To inspect an MCP server implementation, there's no need to clone this repo. Instead, use npx. For example, if your server is built at build/index.js:
npx @modelcontextprotocol/inspector node build/index.js
You can pass both arguments and environment variables to your MCP server. Arguments are passed directly to your server, while environment variables can be set using the -e flag:
# Pass arguments only
npx @modelcontextprotocol/inspector node build/index.js arg1 arg2

# Pass environment variables only
npx @modelcontextprotocol/inspector -e key=value -e key2=$VALUE2 node build/index.js

# Pass both environment variables and arguments
npx @modelcontextprotocol/inspector -e key=value -e key2=$VALUE2 node build/index.js arg1 arg2

# Use -- to separate inspector flags from server arguments
npx @modelcontextprotocol/inspector -e key=$VALUE -- node build/index.js -e server-flag
The inspector runs both an MCP Inspector (MCPI) client UI (default port 6274) and an MCP Proxy (MCPP) server (default port 6277). Open the MCPI client UI in your browser to use the inspector. (These ports are derived from the T9 dialpad mapping of MCPI and MCPP respectively, as a mnemonic). You can customize the ports if needed:
CLIENT_PORT=8080 SERVER_PORT=9000 npx @modelcontextprotocol/inspector node build/index.js
For more details on ways to use the inspector, see the Inspector section of the MCP docs site. For help with debugging, see the Debugging guide.
Servers File Export
The MCP Inspector provides convenient buttons to export server launch configurations for use in clients such as Cursor, Claude Code, or the Inspector's CLI. The file is usually called mcp.json.
-
Server Entry - Copies a single server configuration entry to your clipboard. This can be added to your
mcp.jsonfile inside themcpServersobject with your preferred server name.STDIO transport example:
{
  "command": "node",
  "args": ["build/index.js", "--debug"],
  "env": {
    "API_KEY": "your-api-key",
    "DEBUG": "true"
  }
}
SSE transport example:
{ "type": "sse", "url": "http://localhost:3000/events", "note": "For SSE connections, add this URL directly in Client" } -
Servers File - Copies a complete MCP configuration file structure to your clipboard, with your current server configuration added as
default-server. This can be saved directly asmcp.json.STDIO transport example:
{
  "mcpServers": {
    "default-server": {
      "command": "node",
      "args": ["build/index.js", "--debug"],
      "env": {
        "API_KEY": "your-api-key",
        "DEBUG": "true"
      }
    }
  }
}
SSE transport example:
{
  "mcpServers": {
    "default-server": {
      "type": "sse",
      "url": "http://localhost:3000/events",
      "note": "For SSE connections, add this URL directly in Client"
    }
  }
}
These buttons appear in the Inspector UI after you've configured your server settings, making it easy to save and reuse your configurations.
For SSE transport connections, the Inspector provides similar functionality for both buttons. The "Server Entry" button copies the SSE URL configuration that can be added to your existing configuration file, while the "Servers File" button creates a complete configuration file containing the SSE URL for direct use in clients.
You can paste the Server Entry into your existing mcp.json file under your chosen server name, or use the complete Servers File payload to create a new configuration file.
Authentication
The inspector supports bearer token authentication for SSE connections. Enter your token in the UI when connecting to an MCP server, and it will be sent in the Authorization header. You can override the header name using the input field in the sidebar.
Security Considerations
The MCP Inspector includes a proxy server that can run and communicate with local MCP processes. The proxy server should not be exposed to untrusted networks as it has permissions to spawn local processes and can connect to any specified MCP server.
Configuration
The MCP Inspector supports the following configuration settings. To change them, click on the Configuration button in the MCP Inspector UI:
| Setting | Description | Default |
| --------------------------------------- | ------------------------------------------------------------------------------------------------------------- | ------- |
| MCP_SERVER_REQUEST_TIMEOUT | Timeout for requests to the MCP server (ms) | 10000 |
| MCP_REQUEST_TIMEOUT_RESET_ON_PROGRESS | Reset timeout on progress notifications | true |
| MCP_REQUEST_MAX_TOTAL_TIMEOUT | Maximum total timeout for requests sent to the MCP server (ms) (Use with progress notifications) | 60000 |
| MCP_PROXY_FULL_ADDRESS | Set this if you are running the MCP Inspector Proxy on a non-default address. Example: http://10.1.1.22:5577 | "" |
| MCP_AUTO_OPEN_ENABLED | Enable automatic browser opening when inspector starts. Only as environment var, not configurable in browser. | true |
These settings can be adjusted in real-time through the UI and will persist across sessions.
The inspector also supports configuration files to store settings for different MCP servers. This is useful when working with multiple servers or complex configurations:
npx @modelcontextprotocol/inspector --config path/to/config.json --server everything
Example server configuration file:
{
  "mcpServers": {
    "everything": {
      "command": "npx",
      "args": ["@modelcontextprotocol/server-everything"],
      "env": {
        "hello": "Hello MCP!"
      }
    },
    "my-server": {
      "command": "node",
      "args": ["build/index.js", "arg1", "arg2"],
      "env": {
        "key": "value",
        "key2": "value2"
      }
    }
  }
}
Tip: You can easily generate this configuration format using the Server Entry and Servers File buttons in the Inspector UI, as described in the Servers File Export section above.
You can also set the initial transport type, serverUrl, serverCommand, and serverArgs via query params, for example:
http://localhost:6274/?transport=sse&serverUrl=http://localhost:8787/sse
http://localhost:6274/?transport=streamable-http&serverUrl=http://localhost:8787/mcp
http://localhost:6274/?transport=stdio&serverCommand=npx&serverArgs=arg1%20arg2
You can also set initial config settings via query params, for example:
http://localhost:6274/?MCP_SERVER_REQUEST_TIMEOUT=10000&MCP_REQUEST_TIMEOUT_RESET_ON_PROGRESS=false&MCP_PROXY_FULL_ADDRESS=http://10.1.1.22:5577
Note that if both the query param and the corresponding localStorage item are set, the query param will take precedence.
From this repository
If you're working on the inspector itself:
Development mode:
npm run dev
Note for Windows users: On Windows, use the following command instead:
npm run dev:windows
Production mode:
npm run build
npm start
CLI Mode
CLI mode enables programmatic interaction with MCP servers from the command line, ideal for scripting, automation, and integration with coding assistants. This creates an efficient feedback loop for MCP server development.
npx @modelcontextprotocol/inspector --cli node build/index.js
The CLI mode supports most operations across tools, resources, and prompts. A few examples:
# Basic usage
npx @modelcontextprotocol/inspector --cli node build/index.js

# With config file
npx @modelcontextprotocol/inspector --cli --config path/to/config.json --server myserver

# List available tools
npx @modelcontextprotocol/inspector --cli node build/index.js --method tools/list

# Call a specific tool
npx @modelcontextprotocol/inspector --cli node build/index.js --method tools/call --tool-name mytool --tool-arg key=value --tool-arg another=value2

# List available resources
npx @modelcontextprotocol/inspector --cli node build/index.js --method resources/list

# List available prompts
npx @modelcontextprotocol/inspector --cli node build/index.js --method prompts/list

# Connect to a remote MCP server
npx @modelcontextprotocol/inspector --cli https://my-mcp-server.example.com

# Call a tool on a remote server
npx @modelcontextprotocol/inspector --cli https://my-mcp-server.example.com --method tools/call --tool-name remotetool --tool-arg param=value

# List resources from a remote server
npx @modelcontextprotocol/inspector --cli https://my-mcp-server.example.com --method resources/list
UI Mode vs CLI Mode: When to Use Each
| Use Case | UI Mode | CLI Mode | | ------------------------ | ------------------------------------------------------------------------- | ---------------------------------------------------------------------------------------------------------------------------------------------------- | | Server Development | Visual interface for interactive testing and debugging during development | Scriptable commands for quick testing and continuous integration; creates feedback loops with AI coding assistants like Cursor for rapid development | | Resource Exploration | Interactive browser with hierarchical navigation and JSON visualization | Programmatic listing and reading for automation and scripting | | Tool Testing | Form-based parameter input with real-time response visualization | Command-line tool execution with JSON output for scripting | | Prompt Engineering | Interactive sampling with streaming responses and visual comparison | Batch processing of prompts with machine-readable output | | Debugging | Request history, visualized errors, and real-time notifications | Direct JSON output for log analysis and integration with other tools | | Automation | N/A | Ideal for CI/CD pipelines, batch processing, and integration with coding assistants | | Learning MCP | Rich visual interface helps new users understand server capabilities | Simplified commands for focused learning of specific endpoints |
License
This project is licensed under the MIT License—see the LICENSE file for details.